Nov 10, 2024
Streamline Your Ticket Creation Process: A Guide To Creating And Automating Event Tickets
Learn what it takes to create an event ticket. We also show you some tricks on how to automate them with Stencil.

Sharleena AM
Technical Writer

Learn what it takes to create an event ticket. We also show you some tricks on how to automate them with Stencil.
Event tickets are a crucial component of any event planning process. A well-designed ticket can create a lasting impression on attendees and leave them excited about the event. However, designing event tickets from scratch can be time-consuming and requires expertise in graphic design.
This is where Stencil comes in handy. By using Stencil, you can create professional-looking event tickets quickly and easily.
In this article, we will take a step-by-step approach to creating event tickets using Stencil.
To create your event ticket, start by designing a template that matches the theme of your event. If you don't have a designer, you can find inspiration online.
Next, add important details such as the event name, date, time, location, and any other relevant information. Incorporate high-quality images and graphics that align with your brand or event theme. You can find free, high-quality images that are royalty-free to use from sources such as Unsplash or Pexels.
Lastly, choose a font that is easy to read and consistent throughout the ticket. This will ensure that all information is clear and legible.
What size is an event ticket?
The standard size for raffle tickets with stubs is 5.63” x 1.97”. The standard size for event tickets with stubs 1.97" x 5.63". The stubless ticket with 5.5" x 2.125".
However, you don't have to follow these standard size if you don't want to. Pick a size that matches your event intention and design.
Standard size ticket with stub
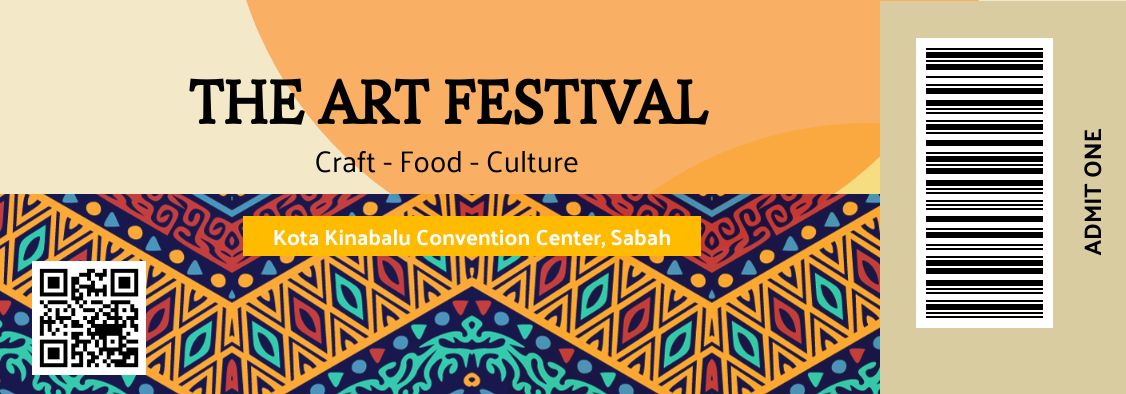
For this example, we have designed a simple template for an art festival.
Including a QR code or barcode on your event ticket is a great way to give attendees additional access to event-related information and facilitate social media connections. With the help of Stencil's easy-to-use features, adding a QR code or barcode to your ticket design is a simple process.
Typically, a QR code is used to provide external links for additional event details, while a barcode is used to verify ticket validity when scanned at the venue.

Default value can be updated through our API
No matter what you choose, Stencil image creator provides both QR and barcode that can be easily customized by you.
There are various of ways to generate ticket with Stencil. Stencil supports generating high quality PNG, JPEG and even PDF.
You can generate your ticket by sending an image or PDF generation request to our API. Don't worry if this sounds intimidating - we've designed it to be user-friendly, with no technical skills required.
All you need to do is visit our console, review your modifications, and click on "Generate." Your image or PDF will appear in the output panel below.

Choose between image or PDF
In addition, we offer a form builder that enables you to create a form for your colleagues to use in generating your image. If you have a website, you can even embed the form directly into it.

Use the form builder to create fields that user can customize

Form is embedable. You have the choice to either generate the ticket as an image or PDF file.
If you're generating tickets for personal events, automating the process may not be necessary. However, for businesses that create tickets frequently, automating the process can lead to increased efficiency. Stencil offers various approaches to automate the ticket creation process, which we'll outline below.
The first approach is to use Zapier to automate ticket creation. This is the most effective method for generating a large number of tickets, as Zapier connects to thousands of other apps.

Automating ticket creation workflow
For example, if you're using online software like PromoTix to manage your ticketings, you can create a Zap that connects to Stencil to create the ticket when an order is placed for an event. You can then connect to more apps like emailing the PDF copy of the ticket.
Learn more on how to use Zapier with Stencil here, 👉 How to use Zapier with Stencil to create a PDF
Another option is to use Stencil's API to automate ticket creation. This API is straightforward and can be integrated into your application to generate online tickets.
Stencil has built-in Airtable integration where you can import data from Airtable base as inputs for tickets creation.
While we don't have built-in integration for Google Sheets, you can still achieve a similar process with Google Sheets. You can refer to our tutorial here where we set up Google Sheets as a web application that uses our API to generate images.
Stencil also provides a way to generate images dynamically using query string URLs, which is useful for sharing tickets online, such as in an email campaign.

Image changes based on the query string input
Finally, signed URLs are another option that generate a URL from the server side and include a secret token, making it possible to invalidate the image if needed.